THE BEST THING SINCE SLICED BREAD IS ….
Monday February 18th 2008, 4:36 pm
NO-KNEAD BREAD
When I first started to learn about yeast cookery it was drummed into me that baking bread was a very tricky skill to crack. Yeasted dough had to be treated with great respect, kept out of draughts, not be subjected to shocks (slamming oven doors etc) kept at just the right temperature and be given sugar to feed it.
Last year I came across a recipe for no-knead bread which seemed to defy all the rules, turns bread making technique completely on its head and still manages to produce a fantastic looking loaf.
The technique, devised by Jim Lahey at the Sullivan Street Bakery in New York was picked up by The New York Times and subsequently created a buzz that quickly swept across America. As far as I am aware, it didn’t reach these shores, or perhaps I just turned my back for five minutes and missed it.
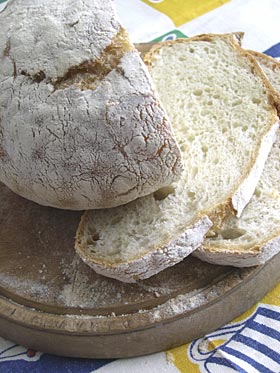
A couple of days ago I came across the recipe again and baked the no-knead loaf for the first time and was just amazed with the result. The ‘no-knead’ part of the title didn’t attract me to the recipe at all, I think most bread bakers like the kneading bit, but this recipe calls for virtually no attention and a considerable amount of time. You mix the dough in 3 minutes flat, then leave it untouched, at room temperature, for 12 – 18 – 24 hours, as long as you like, shape (the very wet) dough into a ball, leave to rise again for 2-3 hours, then, and this seems to be the magic bit, bake the loaf in a lidded cast iron pot, removing the lid for the last 20-30 minutes of cooking time. I’ve got a really great cast iron casserole I bought at Ikea and that worked wonderfully well. Apparently any lidded dish should suffice; pyrex, a terracotta bread crock etc, just make sure that it is totally oven proof.
The texture of the bread is remarkable, the crust is crunchy and crisp and my loaf looked like something I would have paid dearly for if I had bought it at a smart bakery. This morning it made lovely toast. Now I am going to experiment with other flour combinations and flavourings, I’m used to eating sourdough bread with all the rich flavours that offers so just a bit more oomph would make this loaf just about perfect.
Here is the recipe. It is really worth trying it out.
The only part that could be daunting is handling very wet dough. My advice is that after the long rise, scrape the dough out of the bowl with an oiled spatula, onto an oiled surface and use oiled hands to manipulate the dough, though it doesn’t call for much, if any, handling. You can then fold the dough a few times if you like and flour it only when shaping into a ball. Apparently well floured baking parchment is another alternative way to stop it sticking all over the place and driving you to distraction. Don’t be tempted to simply add more flour to make it manageable, it’s the water content that makes it so light and open and I’ve read reports of great results achieved without touching the dough at all.
HOW TO MAKE MARMALADE
Tuesday February 12th 2008, 9:43 am

It wasn’t that straightforward finding Seville oranges this year and as the season is only for a few weeks straddling January and February I had to seek them out. I managed to order some in specially from the organic deli, which fortunately is very close by. When I went to the one and only greengrocers in the nearest town it had sadly closed down a week before. So Tesco has managed to put another independent out of business and another business that thought it was enough to just sell produce without the help of recipe cards and a loyalty points scheme has learnt the hard way.
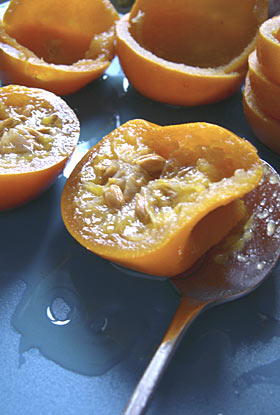
Thankfully I now have some beautiful Seville oranges to cheer me up. Last year I made two lots of marmalade using different techniques to prepare the orange peel. For the first batch I pared and chopped all the peel at the beginning which takes ages but is a ritual with some therapeutic value, at least for the first half an hour or so until the novelty wears off. For the second batch I poached the oranges in my wonderful cast iron pot in the Rayburn for three hours then scooped out the innards and chopped the peel. I think the second method is the easiest and now definitely the one I prefer.

Some of the marmalade I made was beautifully glowing and orange, like looking through stained glass windows when holding the jars up to the light, the rest was slow cooked for several hours in the Rayburn till it ended up deep, dark, rich and caramelised. Both were lovely so I’d be hard pressed to choose which kind I prefer so am now making both types again this year. Find my recipe here.
Seville oranges have such a strong character that they can withstand long cooking and still retain their own distinctive personality. You have to respect a fruit like that. It is worth putting some in the freezer so they’ll be available out of season for keeping the marmalade stock replenished, for making orange curd as well as for rustling up an impromptu bitter orange tart when called for. Just wash and dry the fruits, pack into plastic bags and seal before freezing.
CAN’T LIVE WITHOUT …..
Monday February 04th 2008, 2:45 pm

MAPLE SYRUP
Of course this is just to set the scene. More on maple syrup to come…..
A LONG WAIT
Wednesday January 23rd 2008, 1:38 pm
I’ve never had much time for pears and have always managed to pass them by in the supermarket even when I have been perusing the apples in the niche beside them. It is always great when you discover a passion for something that has just never occurred to you before and in the autumn me and pears fell in love.
A few miles up the road from my house, for five or six weeks in the autumn, a sign appears by the roadside to let it be known that plums, apples and pears are for sale if you care to pull in. I now know to pull in pretty sharpish or else before you know it the sign disappears and you are left thinking, I really did mean to…. next year I really will.
Anyhow, this time I called in to buy plums but there were several varieties of pears on offer as well and I bought some. Of course the big turn-off with pears is that you have to buy them in an unripe state then wait to catch them at just the right moment as they ripen. In this instance, the age old trick played on new apprentices sent to the store room to ask for a ‘long wait’ serves a purpose. I have read that pears need to ripen at home for 3 – 4 days. It has taken me more like 3 – 4 weeks to ripen comice pears so they are just right.
In my quest for pear recipes I have found a custard pear pudding recipe that ticks all the boxes. I now have no excuse to ever waste any fruit again and this pudding is so great it is dangerous (for anyone who has problems with portion control). Here it is.
I’ve also made chocolate and pear jam, my own concoction based on a preserve my neighbours brought back from France for me as a present. When I have perfected the recipe I will post it here, it just needs a bit of tweaking first but is almost there. Believe me, it is perfect on warm croissants for breakfast.
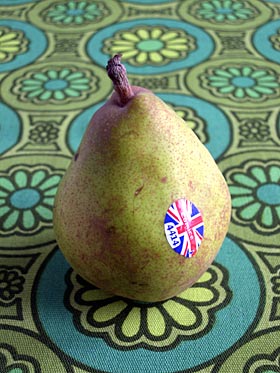
I am not generally a fan of stickers on fruit but have to admit a liking for the Union Jack on British pears, which can still be found in the supermarkets and should be around until the end of February – March time. The shop at the side of the road wont be putting out the sign again until next September.

80’S CHRISTMAS AND THE THINGS WE DID
Monday December 17th 2007, 5:27 pm

Rummaging around in my shed I came across a copy of ‘A La Carte’ magazine from Christmas 1985. In the 80s this title and ‘Taste’ magazine were the big foodie mags and I used to buy them in London to send to my Dad in Lancashire. My Dad loved cooking and had discovered this hobby relatively late in life. He was a cookery book cook and if what he made didn’t look exactly like the picture in the book he considered his efforts a failure. Thankfully food has become a bit more relaxed since then both in preparation and presentation.
Travelling back up north for the festivities, by the time I reached home he would often have saved a job for me to do that for some miguided reason he thought I would relish, usually on the display front. I remember one year he had made a salmon mouse in the shape of a leaping fish which he asked me to complete by surrounding it with dyed aspic. Unfortunately he had been a bit too heavy handed with the blue dye so it looked to be leaping in a municipal swimming pool. Another time he had saved me the job of tying smoked salmon and cream cheese parcels using chives as if they were ribbons – what I learnt from the experience; chives don’t behave like ribbon and do not like to be tied into bows.
Christmas cooking was always accompanied by much huffing, puffing and sighing, swearing under your breath and saying ‘never again’ (until the next time). How ever stressful and seemingly unpleasant those occasions were at the time they are the things I now remember most fondly especially as he’s not here any more to plan these mad meals.
This copy of ‘A La Carte’ was particularly special to us. A feature called ‘Surprise Christmas, it’s all wrapped up!’ was at the time inspired. I now see that Nigel Slater produced the feature (yes I know, that’s what I was thinking, I didn’t know he’d been around that long either!).
All the recipes made food that was gift wrapped. The filo pastry crackers, fabulously innovative at the time, were then copied by other magazines for the next 15 years at least. Me and Dad made them and found a box lined with tissue paper to serve them in.
But my absolute favourite recipe was for chocolate and praline boxes. The chocolate squares you needed to make the boxes weren’t easy to find even then. We had some old family friends over from Australia dining with us and when these little chocolate boxes were served they insisted on being photographed with them.

Here is the recipe. I hope nobody complains about the copyright – it’s Christmas after all and this is in the form of a homage.
Oh and by the way, I managed to buy the chocolate squares last week from an online sweet shop here. I’m going to make the chocolate and praline boxes again as a tribute to my Dad.
THIS STORY HAS LEGS
Friday November 16th 2007, 4:19 pm

Thought I’d bake some muffins using my new ‘fairy feet’ baking cases. I followed Delia’s tried and tested recipe for blueberry and pecan muffins which you can find here.
I have to admit, the blueberry icing was supposed to be a paler pinky colour, but what the heck! They still look very cute all the same and taste delicious.
You can find the baking cups here.
PUMPKIN PIE
Thursday November 01st 2007, 12:31 pm

PUMPKIN PIE AND GINGER CREAM
A couple of days ago Maddy, the little girl from next door, brought me a bowl of pumpkin flesh, dug out of a large pumpkin she was carving for halloween. Here is a slice of the pie I made with it following a recipe I always use and that never fails to go down well. This pie only gets made once a year and some years I don’t get around to it at all.
Preheat the oven to 180 C / gas mark 4
Make shortcrust pastry to line a 23cm loose-bottomed flan tin: 160g plain flour, 80g unsalted butter, 1 – 2 dessert spoons caster sugar, zest of half a lemon (optional), 1 egg yolk, a drop of milk or water as required.
Rub the butter into the flour, add some sugar and lemon zest if you like then bind together quickly using the beaten egg yolk, adding some milk or water to bring the mixture together and gather it into a ball. Leave to rest for half an hour in the fridge, wrapped in cling film.
Roll out the pastry and line the buttered flan tin. Prick the bottom with a fork and place a piece of greaseproof paper and baking beans over the base. Bake for 25 minutes then take out the oven, remove the beans and paper and leave to cool.
Cook 600g of pumpkin flesh in a pan for approximately 15 mins with just a splash of water; as it cooks it will make its own juice so you don’t want it too watery. Put the cooked flesh into a food processor (or use a hand blender). Add to it, 125g soft brown sugar, half a teaspoon each of nutmeg, ground ginger and ground cinnamon, 1 tablespoon honey, grated zest from each of 1 lemon and 1 orange and the juice from half of each. Process until smooth. Add 3 beaten eggs and blend together then pour into the pastry case and bake for 50-60 minutes until the centre is set.
Allow to cool then serve dusted with icing sugar and accompanied by whipped cream slightly sweetened with some of the syrup from a jar of stem ginger.