Wednesday April 04th 2012, 11:30 am

Happy Easter from The Laundry and Laundryetc.
5 Comments


Happy Easter from The Laundry and Laundryetc.

This is supposed to be a quick one, but in true geek style has become something more. Inspired by Kerstin Rodger aka MsMarmiteLover trailblazer and proprietor of the first underground supper club in the UK, whose blog post at The English can Cook about her love of jars and forthcoming supper club event this Friday Jar Food – Pickles, Potions and Preserves , got me thinking about …. jars. Seemed like a quick blog post to gather some of my favourite jars together, without it becoming some big deal would be a possibility. Trouble is, that when the differences in ridges on glass are something you admire, you get sort of, caught up. Anyway, here are just a few from my collection and I hope you enjoy them as much as I do.

Vintage French jam jars are such classics and feature plenty of ridges and facets in all sorts of variations. A good heavy handful and chunky lipped edge are what you want. A few nibbles around the top are OK too. You can always use them as candle holders and vases if you don’t have any confiture to fill them with. I will be selling some of my vintage French jam jars at the Selvedge Spring Fair on the 2nd April in London. Follow link for more info.

When I wrote Fruits of The Earth my preserving book, (sorry currently out of print but will be available again in paperback in June) the publisher asked me to use some Ball jars, to suit the American market. They are virtually impossible to buy here in the UK but by one means or another, I’ve acquired a few along the way. These vintage ones in beautiful turquoise glass look great when used as vases.

I always look out for interesting shaped jars and my vintage English Wye Valley Preserves jars (I’ve got 2 of them) are real favourites. They just wouldn’t make them like that these days. Finding them was sheer fluke, so sorry no tips on where to look. Just keep your eyes peeled.

Another Ball canning jar, this time with wire bale clip top. These aren’t recommended any more for canning but people do still use them. Finding new rubber seals is the problem. See the brilliant Food in Jars for more info about this.

I love Ball quilted jelly jars and again you can’t buy them in the UK. My friend Chris brought me 2 back from the US a while ago and I use them repeatedly. They are so cute and worth looking out for if you are in the States.

I’ve been given quite a few old Kilner jars by people. Often I’m given them because their owners think them now redundant but in fact you can still buy replacement seals for them. Peter Denyer at The Kilner Jar knows everything there is to know about Kilner jars, sells the seals and also reconditions the rusty tops. A real niche business. These Kilner Improved jars are great because they have a glass lid. For canning, there is something really satisfying about only natural materials, glass and natural rubber, being used here. Look out for old jars on your local Freecycle.

Weck jars and flasks have such simple lines and are great for the modern pantry. Again, just glass and rubber used here and they work so reliably. I’m a big fan of canning cordials and syrups and find the 1/4 and 1/2 litre size flasks most useful. Weck jars are really easy to open as you simply pull the rubber tongue to release the seal. Also seals are reusable.

With great 70’s style, these vintage Ravenhead Kilner jars are another favourite that I use a lot. The screw bands were made in orange, red and brown plastic, and also white apparently, but I’ve never seen one of them. Again try The Kilner Jar for replacement seals. The last canned jar I tried to open was so well sealed that I had to email Peter Denyer for advice on how to prize off the lid. In true expert fashion, he told me to carefully slide a knife under the seal and gently lever. You have to be careful when doing this as chipped edges can totally ruin a canning jar and make it unusable.
Kerstin’s Jar Food supper club is one NOT to be missed. Also her book Supper Club – Recipes and Notes from The Underground Restaurant is available to pre order on Amazon and will be published at the end of March.

Just to let you know that I will be exhibiting at The Selvedge Spring Fair on Saturday the 2nd April 2011 at St Augustine’s Church Hall, Langdon Park Road, London N6 5QG. 10am – 5pm Entrance £2.50 I will be selling textiles from The Laundry, vintage French jam jars as well as some of my homemade preserves. My talented and creative friend Deborah Schneebeli-Morrell will also be bringing along some of her amazing papercut designs and we are working on some really special labels for labelling preserves which wont be like any others you have come across before. I will tell you more nearer the time, but in the meantime, do make a note of the date in your diary. See the Selvedge website following the link to see who else will be there.

Month eight Tigress’s can jam canning challenge and for August the ingredient chosen by the inspired and inspiring Julia is tomatoes. My relationship with this ubiquitous fruit has been a checkered one. I hated tomatoes as a kid but learnt to tolerate them later on. I do like them as a sauce for pizza, applied with a lightness of touch though. I can now eat cherry tomatoes raw and, like biting into any fruit, appreciate their sweetness so I suppose you could say I’ve made progress.
But it is as objects of beauty that tomatoes especially come into their own. The resurgence of interest in growing heritage varieties has brought all these wonderfully coloured tomatoes to the fore; striped, heart and pear shaped, shaded like a shop display of lipsticks, from gold to chocolate. They are all so fantastically photogenic and worth growing for looks alone.
As an ingredient for canning, they are on the acidity cusp. Tomatoes require special attention for bottling safely using the water processing method or else should be pressure canned. They are only just on the acid side of neutral and acidity can vary for different varieties, so it is necessary to add a little more acidity in the form of lemon juice or citric acid to make sure they stay safely putt. It is important that time spent preserving has a very definite pay off later so it makes sense for me to bottle really useful tomato passata-type sauces for cooking up further down the line into pizza toppings, pasta sauces or as additions to winter casseroles.

Each year I begin the growing season with high hopes for an extensive range of weird and wonderful tomato varieties. I don’t have a greenhouse so can only grow toms out in the open. We’ve had two consecutive years of blight bringing these plans to a soggy and disappointingly diseased halt, but this year the weather has been kinder. Tinned tomatoes are as cheap as chips, so I don’t think it is really cost effective to bottle tomatoes unless you have your own homegrown supply or you are able to mop up someone elses glut. The plants I have growing in the garden are still some way from the ‘glut’ stage. Thankfully my neighbour Jane has a greenhouse as well as green fingers. She sells her excess garden produce from her garden wall. Last week I picked up four generous punnets of yellow and red tomatoes from the wall and dropped my payment into the honesty box provided.

So first a basic tomato sauce. These cherry tomato varieties are as sweet as anything though perhaps not the most ideal kinds for bottling. For sauces, larger fleshy varieties like Roma and San Marzano are good. Skinning so many tiny fruits was definitely out of the question for starters. Tomatoes can be very watery, which means that they will require considerable cooking to reduce, thicken and intensify the flavour, unless some of the liquid is removed first.
In order to give a fresher flavoured result with less cooking time I began by slitting each fruit and removing the seeds by running my thumb quickly through their middles, collecting the seeds in a sieve placed over a bowl. Any collected juice would come in handy later. After a brief cooking time of 10 minutes the de-seeded tomatoes were then processed using a passata mill, running it through several times to separate the skins from the pulp. The passata mill is a bit of kit I acquired some years ago when dreaming of a bounteous tomato crop that never materialised. The mill has sat unused in its box ever since so this was its first opportunity to prove its worth. I must say that I wasn’t too impressed. Passata-ing the tomatoes was a messy and annoying business (compounded by trying to take photographs at the same time). Tomato juice splattered all over the place and possibly it was my fault, but juice was squirting out the handle side as well! Next time I will most likely use my regular food mill over a bowl, which though still requiring patience would be less messy and more controllable. Depending on the scale of the project, to remove skins and any stray seeds you could simply push the tomatoes through a sieve if you prefer. Still too watery for my liking, I strained the flesh again briefly in a sieve collecting more juice to add to what had been collected earlier. 2.5Kg (5 1/2lbs) of tomatoes resulted in 775g (1 3/4lbs) puree and 750ml (1.3 pts) of juice.

HOW TO BOTTLE TOMATO PUREE
Prepare the water bath, jars and seals ready for bottling (canning). For more info about how to hot water process, refer to the guide here.
Put the pureed tomatoes in a pan and simmer for a short time to reach a consistency that suits you so excess juice has evaporated. If the puree is already thick enough simply bring to boiling point. I added 1 tsp sea salt (a non essential, so add salt to own taste or leave out all together) plus an aditional acidic booster. As a general guide you need to add one of the following to every 500ml (1 pt) tomato puree: 1Tbsp lemon juice or 1/4 tsp citric acid. I used balsamic vinegar instead, adding 2 Tbsp balsamic vinegar per 500ml (1pt) puree.
Place a basil leaf inside each jar against the glass and fill jars with tomato, leaving headspace required for your type of jar. Remove bubbles from sides of jars using a small spatula, wipe rims clean and seal. Process 500ml (1 pt) jars for 35 mins and 1ltr (quart) jars for 45 mins. Remove jars from water bath and leave till cold before testing the seals. Any jars with loose seals will require reprocessing or you can keep them in the fridge for using up within a few days. Remember to label all your jars before storing them.
My tomatoes made 2 x 350g (12oz) jars of sauce plus a bit more that I had with pasta for my dinner that evening.

WHAT TO DO WITH THE JUICE
It seemed a shame to waste the lovely sweet juice collected whilst extracting the tomato puree, so I decided to turn it into tomato jelly. You could flavour tomato jelly with fresh ginger and ground coriander or finely chopped chilli. After much deliberation I eventually chose vanilla and white pepper for a jelly with a sweet / savoury crossover. This jelly is delicious on sourdough toast with cream cheese and I used it to fill tiny savoury pastry cases, topped with sour cream or crumbled goats cheese for a really exquisite little mouthful.
As tomato juice is lacking in pectin, a boost in the form of the addition of lemon or apple juice is helpful. Having bottled some whitecurrant juice several weeks earlier to use at times like this, I added some of that for its setting quality. Preserving sugar containing added pectin could also be employed here. Adjust proportions to suit what you have available.
TOMATO, VANILLA AND WHITE PEPPER JELLY
750ml (1.3 pts) tomato juice (a byproduct of making the puree above)
550g (1 1/4lb) sugar
Juice of 1 lemon or 150ml (2/3 cup) whitecurrant juice
1 vanilla pod, split and seeds scraped from inside
1/2 tsp ground white pepper
Prepare the water bath, jars and seals ready for canning. For more info about how to hot water process, refer to the guide here.
Pour the juice through a jelly bag, collecting the juice in a measuring jug. To every 600ml (1 pt) juice add 450g (1 lb sugar). Place all the ingredients in a preserving pan. Stir constantly over low heat until the sugar has dissolved then turn the heat up to bring to a rolling boil. Boil to setting point, (it took me about 10 minutes) when a blob of syrup on a cold plate will formed a skin when you push your finger over the top of it. If using a jam thermometer it will register 220F 105C. Remove the vanilla pod and fill hot jars, leaving the required headroom for their type. De-bubble the sides using a small spatula or chopstick, wipe jar rims clean, before sealing and placing in the hot water bath. Process for 10 minutes, remove from the bath, then leave till cold before testing the seals. Label and store.

The ratio of sugar to juice is the classic one used when making jellies. This jelly is very nice indeed but I will be tempted to cut down on the amount of sugar when I make this next. It is often safe to keep jams and jellies without hot water processing (canning) them. If you do can them you are making doubly certain that they will be preserved safely for a year or even longer.

I first came across angelica, the herb, when I looked round my neighbours garden a few years ago. Jane and Les Hales’s garden is very special, so special in fact that it is open to the public a couple of days a year as part of the National Garden Scheme. Jane has planted angelica in several parts of the garden and uses this tall stately plant to form screens against the house. I was instantly impressed by the plants towering stature and amazing flowerheads that look so graphic and beautiful against blue sky.
Jane usually has a few seedlings for sale at her open days. Apparently once you manage to get angelica to grow, this biennial seeds itself freely, so restocking the plant is not an issue. I have tried growing it since then. The first two years, our wet summers encouraged the slugs to decimate my young plants, so even my best efforts came to nothing. This year is looking slightly brighter, and I already have a plant doing well on my allotment and a few more small seedlings that I am cherishing a little longer before planting them out to fend for themselves.

I had a vague recollection of candied angelica from my childhood, a strikingly vibrant green confectionery used to decorate trifles, a small strip pushed into the cream top layer either side of a bright red glace cherry, and can just about recall it having a rather exquisite and unusual flavour, but that was as far as my knowledge went. I certainly had no inkling that it came from a herbal or vegetable source. This of course set me off on a quest to find out more about the culinary merit of this impressive herb and I vowed to have a go at candying my own angelica to try and rediscover the distinctive flavour remembered as a kid.
All parts of the plant are aromatic and edible. The stems are the bits you candy to make confectionery, the leaves are used for flavouring many liqueurs such as chartreuse as well as in the preparation of bitters, and with juniper berries to flavour gin, the root is blended with wormwood and other herbs to make absinthe and the seeds impart a muscat-like flavour to wine and are used in the preparation of vermouth. All impressive stuff.
Stems for candying or crystallizing need to be young. It is no good waiting too long to harvest them as by June – July time they will be far too stringy and tough to work with. You will know by now that being prepared well enough ahead is not my strongest point, but this year, for once, no doubt prompted by Tigress’s can jam canning challenge I am taking part in, which has chosen herbs for our April ingredient, I have gotten round to acquiring a handful of stems and a nice bunch of leaves from Jane which she very kindly cut for me. The plan, to use angelica as my canjam ingredient (post to follow this one), but also to candy some stems at the same time.

What is interesting is the point at which the angelica turns from a herby savoury scent and flavour to a sweet unctious syrupy one. The stems need first to be boiled and scraped, which is a bit fiddly, before layering them with sugar to begin the transformation. As I had very few stems to play with, I used some of the thicker leaf stalks as well. Apart from the peeling process, it was merely a matter of 5 or 10 minutes of activity followed by a day or so of leaving well alone, so it is hardly taxing. As soon as a syrup started to form, the angelica took on the magical taste I remembered and I felt as though I had captured the essence of this wonderous herb. It is worth having a go, even if you only candy angelica once in your life. The basic recipe I followed comes from Bee Nilson’s Herb Cookery, published in 1974. She is one of my favourite cookery writers for allsorts of reasons. Scale the recipe down if you don’t have enough stems.

HOW TO CRYSTALLIZE ANGELICA
1/2kg (1lb) angelica stems
Wash the stems and cut into 8-15cm (3-6in) lengths. Boil them in enough water to cover until the stems are tender. For young stems this should only take about 10 minutes. Drain well, rinse with cold water and drain again. Scrape the outer skin from each piece. I found it easiest to slit down the side of each hollow tub and lay them flat on the surface. The skin comes off really easily but you need a lightness of touch so what remains isn’t damaged. Place them in a shallow dish.
1/2kg (1lb) caster sugar
Sprinkle the sugar evenly over the stems. Cover the dish and leave it for 2 days by which time the sugar will have dissolved and become syrupy.
250ml (1/2pt) water
Put the angelica, sugar syrup and water in a pan and heat whilst stirring until the syrup boils. Simmer gently until nearly all the syrup is absorbed and the angelica is clear. Add more water if the syrup has all gone but the stems aren’t looking transparent. Drain the angelica and leave till cool enough to handle, then roll them in more caster sugar to coat them generously. Spread the pieces on a wire cooling rack and finish drying them in a warm place or a very cool oven. When cold wrap the angelica in waxed paper to store.

This year, Ramblers, Jane and Les Hale’s garden at Aylburton Common in the Forest of Dean, is open as part of the National Garden Scheme on two Sundays; 2nd May and 13th June 2-6 pm, and also by special appointment during May and June only. You can find more information on the National Garden Scheme website here.


I was really pleased with the photographs of my old pegs that I posted a few weeks ago. Since then I’ve acquired even more. It is hard to believe that pegs could come in so many different styles, but the fact that they are all handmade by someone, once, and designed to do a necessary job makes them especially interesting to me. I don’t suppose they were ever considered as things to warrant attention.
The first set of pegs are quite large. They have been turned on a lathe as there are marks in the tops which show where they were attached for turning. I think they are oak but seem to have been stained to give them a rich woody colour.

The second set are again quite big, clumsy and chunky, hewn from untreated oak. The tops are square and have been thoughtfully bevelled at the corners, to make them more comfortable to handle when being pushed down onto the washing line.
The last set look like conventional dolly pegs but, though my photo doesn’t really convey it, they are child sized, each peg only 6cm long. They are like the first pegs given to me as a child by my Aunt Lily, who always gave the best presents and had an innate sense for what you’d want more than anything in the world. Whoever owned these little pegs hand stitched a flannel bag to keep them in. Small nimble fingers sewed on a press stud fastening to keep the pegs safe and tidy.


I’ve just been out on a little jaunt. Feeling haunted by thoughts of a kitchen cabinet, spotted on my wanderings yesterday but not purchased at the time I decided that £5 was a snip for this modest item with original 60’s patterned formica top, and so closed the shop for an hour to go and buy it. I would most likely have saved the cost of the cupboard in petrol money if I’d bought it yesterday – such is the folly of cost cutting mind games.

The cupboard was at my favourite second hand place in the forest, called Gorsty Knoll. I am in two minds as to whether I should make the name public, as I don’t really want the world and his wife trying to find it, but in a way, the name is as strange as the place, so I think it merits a mention. Basically, this second hand furniture dealer sells a load of old tatt; house clearance boxes, old cutlery that has seen better days and that was never up to much in the first place, divan beds and comfy but ugly sofas. There is always a big pile of broken furniture by the door, chairs missing a leg and bits of rusty old bedsteads.

I absolutely love the place. You always feel that there is a hidden gem just waiting to be discovered and I have found a few over the years. This guy doesn’t seem to bother with textiles. I’ve asked him before and he says that linens are usually thrown away or taken to the charity shop. As I was leaving with my new purchase in the back of the car I caught a glimpse in the back of his van, the van he uses to do his house clearance jobs and thought how great all the blankets looked hung on the bars lining the inside. He thought I was mad when I asked if I could climb inside and take some pictures, he hadn’t ever looked at them in that way. As I drove away I realised that the road was lined with wild damson trees covered in fruit, screeched to a halt, parked up pronto and filled a bag with them. What a flippin’ fab day out.


If you find an empty jam jar exciting, you are a very lucky person indeed. It surely means that you can appreciate the simple things in life that make just living a rich experience. Well that’s my theory anyway.
A recent editorial in the Telegraph for The Laundry showed an image of the vintage French Jam jars that I stock in the shop. When you get a bit of publicity like that you realise that you are not alone in your appreciation of the glass jar, as lots of people got in contact keen to get hold of some. (By the way, I sold the ones I had really fast but more are on their way from my French jar hunter, so I’ll be in touch again very soon.)
I’ve been working on how I want my own range of preserves to look, that I intend to sell here at The Laundry. The range will be called Glut Kitchen and I’ve been looking for the right jars and lids to use as well as thinking about the feel that I want the branding to create. This is all before any jam gets made. Once you start thinking in this way you realise the limitations. It isn’t a matter of finding the loveliest jar you can, as you can bet your life it will be far to expensive and impractical to use, making the end price for a jar of jam way over the top.
I thought you might like to see this vintage jar I recently acquired. It isn’t French this time, it’s British. Yes once upon a time we made such things and did a great job of it. Not only does it have a nice faceted pattern around the sides but it says ‘Wye Valley Preserves’ around the rim. The jars I choose for my own range wont be anything like as fancy as this and I doubt that in years to come someone will be waxing lyrical about an old Glut Kitchen jar, but fingers crossed they will remember the taste of the jam it contained.


I thought you might like to see these old clothes pegs. With a company called The Laundry it was inevitable that I would acquire some interesting laundry related things over the years. I haven’t set out to collect these things avidly but chancing upon them, I have just picked them up along the way. Old wooden clothes pegs have such a lovely hand-crafted look about them and these ones would most certainly have been hewn out of British timbers, hard enough to stand the test of time and repeated use.

I discovered some of them in an old peg bag found at a car boot sale. You do sometimes find all different shaped pegs jumbled up together and if you are lucky there might be some special examples in amongst the bog-standard ones. The three big chunky pegs were sold to me as blanket pegs and one of them has a few woodworm holes.


I went up north for a few days last week and made sure to visit the car boot sale in Preston whilst I was there. It is the best sort of car boot, in so far as there is always so much total rubbish on sale that it fills you with optimism that a bargain is just waiting to be found in one of the grubby house clearance boxes.
I only bought 3 old cookery books but felt that my rummaging time was time well spent. One of the books, Good Food by Ambrose Heath, is an absolute corker. Unfortunately, it long ago lost its dust jacket (which I would love to see) and from the outside it seems quite uninspiring, battered linen, aged and discoloured beige, but inside is such a treat. It is often said that nothing is new and this book clearly proves the point. It is set out month by month with recipes using seasonal produce and rather than the recipes being laid out in the usual manner it has running text with the recipe headings written in the margins. A bit like Nigella Lawson’s How To Eat. I bet you anything that in the editorial meeting when they came up with the format for Nigella’s book they thought they were being groundbreaking. In fact they were pipped to the post by 70 years, Good Food was published in 1932.
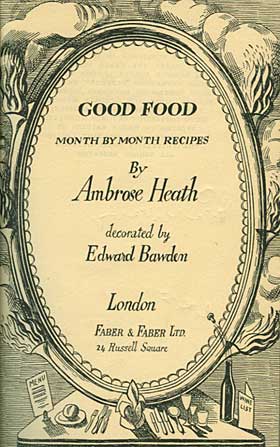
To make the book even more fabulous it is illustrated by Edward Bawden, with an image to represent each month as well as some smaller incidental images of cooking implements and produce. If only it still had its dust jacket, I imagine that would be really special. Of course now I am on Ambrose Heath alert and am looking out for more of his books. Apparently he was a very prolific cookery writer (1891-1969) and wrote around 100 books on just about every food subject and ingredient under the sun. I would particularly like to see ‘Open Sesame – The Way of a Cook With a Can’ published in 1939 (sorry Delia, he beat you too it).
Anyway, keen to try out some of his recipes I spotted one for Orange Jumbles, which are a flat sprawling biscuit made with flaked almonds and orange rind and juice. I am getting ahead of myself here as they are in the April chapter but as we can usually find oranges of some kind all-year-round and recipes with funny names are always a good thing then why not?. I decided to experiment and have had to make them a few times to get the recipe right – hard work but somebody had to do it. I have substituted some of my Seville marmalade as an ingredient, missed out cochineal, who on earth uses that these days, and they seem to have worked out pretty well. Ambrose didn’t seem to believe in molly-coddling his readers and the recipes are suitably vague on technique.
Of the Orange Jumbles he writes, ‘To say that they are indescribably charming really describes them’. If I wasn’t so busy eating my way through a plate of jumbles I’d say ‘I couldn’t agree more’.
Here’s my recipe for Marmalade Jumbles.