


Well this week I managed to get my asparagus bed planted, which felt like no mean feat. The soil needed a lot of attention and I took great care to remove any perennial roots I could find as I sifted through it, as all the books tell you you must. When the asparagus crowns were safely in their straddling positions and covered with earth, instead of feeling a great sense of achievement I was positively down in the dumps; only 2 more years to wait for a crop. Whoopee, roll on 2013! By then I’ll be two years older but hey, I’ll be eating my own homegrown asparagus. I don’t seem to have quite the right attitude, do I?
Anyway, what next? Time to plant some seeds to fill in the gaps around my fruit bushes. I love buying the packets with inspiring pictures of my prospective crops on the front, but you really do have to get them in some compost as they don’t do that themselves. I decided to go visit my friend Shelley, who is a brilliant gardener and font of horticultural knowledge, for a masterclass in seed sowing. She will surely give me the inspirational uoomph I seem to be currently lacking to restore my gardening mojo.

Shelley is really into growing veg. She grows some for her local show and the competitive bug has well and truly taken hold. Her garden is set out in quite a formal way, with geometric shaped raised beds all working towards central focal points, in the style of a classic parterre with finials on every corner. There is a four sided regency arch with a chandelier hanging from the centre which will soon have sweet peas and climbing beans scrambling over it. The difference with Shelley’s planting style is that she fills the beds with vegetables and uses them in a decorative way. So instead of the beds being edged with box hedging, she uses broad beans with green stakes, or leeks growing for showing in terracotta tubes. Each year the planting changes as the crops rotate. She starts her potatoes off in small pots of compost then plants them as part of the pattern, planting and earthing up in one fell swoop. The soil looks amazing and she is the best person I know to consult when I want to know just what particular element a certain crop will need, beit more nitrogen or a little potash to get the best results.

First she showed me some seedlings that she hadn’t grown from seed. Both of us seem to have arrived at the point where we have realised it can be unproductive to want to grow absolutely everything. Sometimes being over ambitious can be a problem. Though we both share a love for unusual plant varieties we’ve concluded it’s better to grow a good classic, great tasting spud than some weird purple sort that only looks good in a photo. There is always room for experimentation but the best flavoured crops are now a priority. Shelley has some dill seedlings that were bought as one pot from Homebase which she then split to make six very healthy looking plants. That would suit me fine too. I need some dill for my pickling, so this would also work well for me. No need to always invest in a whole packet of seed.

Next she planted up a tray of her special Serbian pole beans. She’d been given this bean some years ago and saves more seed each year. This bean apparently has a very fine flavour, can be eaten fresh but stores well when dried. Perfect for my preserving garden. The compartments of a recycled seed tray were filled with Shelley’s specially mixed seed compost and a bean was pushed into each one, covered with a bit more compost, et voila, that was easy enough.

Shelley showed me her trick for broad beans, where she germinates the beans in a plastic bag partly filled with compost, just throwing her handful of beans inside, tying the bag and placing it by her Rayburn for a few days. It is also a good way of testing the viability of the seed if it has been hanging around for a while. This means that only germinated seeds get planted and avoids any gaps in the rows that you sometimes find when planting straight into the ground.

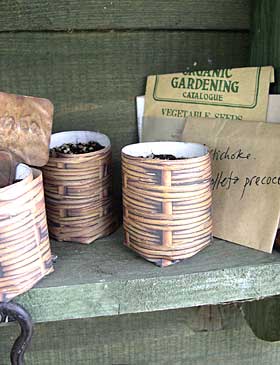
Seeds that traditionally would be sown straight in the ground and resent root disturbance can still be started off in pots, but for these a biodegradable pot works best. Beetroots and parsnips fit into this category. Shelley had some paper pots already made from newspaper for this job using a paper potter. The beetroot seeds contain several seeds in a cluster, so it is only necessary to put one seed per pot. By the time they are ready for planting out the newspaper will easily disintegrate and allow the roots to work their way out into the surrounding soil.
As the rows of seeds were sown each was labeled to avoid any confusion later on. All the seeds were lightly covered with compost except some romanesco brassica seeds that like to be planted on the soils surface. For these a light sprinkling of vemiculite neatly finished them off. All the seeds were given a sprinkling of water from the watering can then placed out of the way to germinate, in Shelley’s case on a shelf in a cold greenhouse.

So spurred on I set of back home, my tray of Serbian pole beans on the car seat beside me as well as a globe artichoke plant and a bunch of freshly picked lovage. I’m now feeling full of enthusiasm to get planting. As Shelley opened the gate for me to drive away, I thought I’d give something back in return and handed her a very healthy looking Jerusalem artichoke that just happened to be sitting in a bag in the car, recently collected from someone on Freecycle, who had offered them for free. They are the plumpest, healthiest artichokes I’ve ever seen in my life! Shelley was also suitably impressed with their quality and happily accepted my gift. That’s the great thing about gardeners, simple things can mean such a lot.